Tuesday, September 27, 2011

Portabella's!


I love Portabella mushrooms. They are hearty and when cooked right can be as satisfying as a steak. Aren't they referred to as the Steak of Mushrooms?  I think I have heard that somewhere...anyway since I am still stuffing everything in sight I wanted to stuff these with lump crabmeat and serve them with a salad for a little bit of a lighter meal.
Making the stuffing for the mushrooms was easy.
I took the "button" of the mushroom out of the center and chopped it up.  Then I added a grated  stalk of celery, a diced onion and a clove of chopped garlic and sauteed it in a pan until the onions were clear. I also had leftover asparagus so I cut them up and added them to the mixture.  I added a little bit of mascapone cheese (maybe 2 tablespoons) mixed it up  and then added the lump crabmeat to the mixture in the pan and seasoned it with salt and pepper.
Put the crabmeat mixture into the mushroom caps and then drizzle with olive oil and balsamic vinegar.
Bake in a preheated 375 degree oven for 20 - 25 minutes.
The mushroom will wilt and be tender.
I served the mushroom on top of a tossed green salad.
It was a perfect dinner.


Buon Appetito
xoxoxo
Lorraine

I am on my way to Las Vegas and won't be posting for a few days. However, I will be returning with some fabulous pictures of wonderful food to share with you !  I'm going to be in Foodie Heaven!


Friday, September 23, 2011

Stuffed Artichokes, Nona Style

 I love the fall weather and the foods that get associated with the cooler weather. Meals become a little more hearty, filling us up and are just so satisfying. This is like Italian Soul Food! The flavors hit a spot that you just fall in love with, making your soul smile.
My mother would make these artichokes  all the time. She would serve them as a side dish, which was absolutely crazy. They are a meal! Serve them with a fresh green salad, a loaf of Italian Bread and you're done!
When my son John was in 5th grade they were having a discussion on food. His teacher mentioned that she loved artichokes. Some of the kids in the class didn't even know what an artichoke was. John, proudly raised his hand and told his teacher that I made them stuffed with sausage. Another student raised his hand and said his mother makes them and serves them with Russian dressing! HMPF! With a light in her eyes she turned to John  and said, "I would love to taste those!"  That was the start of lovely parent teacher conference's that would be held in my kitchen.
Joan didn't finish the whole artichoke, however she did ask to bring the rest of it home. I was more that willing to comply!


Would you like to make these? Here's what you will need.
Sweet Italian Sausage
Chop meat
onion - chopped fine
garlic - chopped fine
fresh chopped parsley
egg
salt and pepper to taste
grated Italian cheese ( use what you like)
a small handful of seasoned bread crumbs
water and or chicken stock

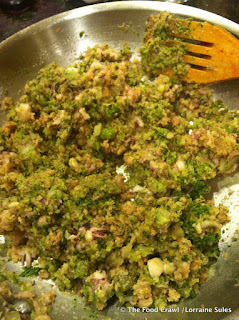
Make a mixture with all the above ingredients,  like you were making a meatloaf or a meatball mixture.

Clean your artichokes, I cut the pointy tops off and clean up the outer leaves.  I also cut the bottom of the artichoke to make sure that it will sit up. After I've cleaned up the artichokes I start to gently manipulate the leaves to get them ready to stuff.  I pack them with the meat mixture starting on the inside working my way out. Once they are all stuffed I like to braise them on the top of the stove. I add chicken stock to the pot, covering about an inch of the bottom of the artichoke, a bay leaf and half a lemon. Bring the liquid to a boil, lower the heat, cover and let simmer until the meat is cooked through and the artichokes are tender. I will just pull on an inner leaf and if it comes out easily it's done. I usually cook these for about an hour, checking on them during the cooking process to make sure all the liquid does not steam out. If you need to add more liquid, add a little bit of water.


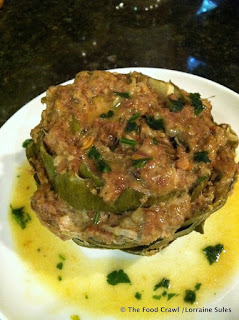
When they are done they will look something like this!

Spoon some of the sauce that's in the pot over the artichoke and add some fresh chopped parsley to the top and enjoy!

Buon Appetito
xoxoxo
Lorraine

Monday, September 19, 2011

Ham Bone and Bean Soup


I am a soup lover. If I could, I would have soup every day of the week. Chicken soup, beef soup, fish soup, vegetable soup, clear broth, creamy broth, tomato based broth, it doesn't matter...I love them all!
While living in Florida, in my very lean days I could make a chicken go a very long way! One pot of soup would feed me for the week.

Every Monday night, Aunt Rose would put on a pot of soup! Anyone who wanted to come to her house was always welcome, and every Monday there was Soup and a crowd ! After a weekend of over indulging she felt that soup was good food, and it helped clean your body out from all the crap you ate over the weekend!
To this day, it is a very rare Monday in my house where there is not a pot of soup cooking. My family knows that if it's Monday, it's a soup day!
It's Monday, so today we're Food Crawling with Beans and a Ham Bone! Now that's what I'm talking about!

I start making the soup with a trinity of carrots, celery and onions!  I like my vegetables on the chunky side. In a large pot I'll add the chopped vegetables to a little bit of olive oil and saute them for just a little bit. Maybe a minute or two. Then I'll add the beans. Goya makes a great bag of beans that has something like 18 different beans in it. I absolutely love the mixture of beans.

 Once the beans are in I add the ham bone. When ever we have a ham I save the bone. I always leave lots of meat on the bone. I'll make a bigger ham just so there is plenty of meat left on the bone. Who wants a stingy ham and bean soup!? lol We like big chunks of ham!

 I add enough water to the pot to cover the ham bone, and season with salt and pepper, two bay leaves and a tablespoon of McCormick Caribbean Jerk Seasoning. It's sweet and spicy and adds a little bit of heat.  Bring the soup to a boil and then cover the pot and let the soup simmer for at least an hour, more like two. When the meat falls off the bone, and the beans are tender the soup is done.

It's a meal, with nice big chunks of ham and delicious tender beans and vegetables that melt in your mouth!

Buon Appetito
xoxoxo
Lorraine

Thursday, September 15, 2011

Ricotta Cheesecake

This is not your normal ricotta cheesecake. It is so smooth you would think that you're actually eating a New York Style Cheesecake! I have no idea where this recipe came from. It was written on an index card in my own hand writing. It's definitely from my single days, I just have no idea from whom I got it.

Ricotta Cheesecake
3 pounds ricotta cheese
8 large eggs
2 teaspoons vanilla extract
zest from one orange
zest from one lemon
1 1/2 cups sugar
1/3 cup of cornstarch

Preheat oven to 350 degrees

Butter a 9 inch springform pan and then dust it with flour.  Using aluminum foil tightly mold the foil around the outside of the pan. Set aside.
In a blender puree the ricotta cheese, until very smooth. Do this in batches.  Add the eggs one at a time while the blender is going.
Take out mixture of ricotta and eggs and pour into a large bowl. Add the sugar, zests, vanilla, and cornstarch making sure all is mixed in well.
Pour the batter into the prepared springform pan.  Place the pan in a large roasting pan and carefully add hot water to the pan so that it comes to about one inch outside of the springform pan.
Bake for 1 1/2 hours until the top is golden. Insert a knife and if it comes out clean it is done.
Turn the oven off and prop open the door and let the cake rest in the oven for 30 minutes.
Remove from oven and let rest to room temperature.
You may serve this at room temperature or chilled.
I like to dust the top of the cake with some powdered sugar.


Enjoy!
Buon Appetito
xoxoxo
Lorraine

Saturday, September 10, 2011

Stuffed Pork Chops

I am stuffing everything at the moment and having such a great time doing it. I don't know what it is about eating something that has been stuffed, it's so fulfilling!  Pardon the pun! Anytime I see something stuffed offered on a menu I know I'm usually in for a hearty meal.
There are so many different stuffings you can make depending on what you like to eat.  If you've been following me for a while you know that my family loves sausage. Let's get stuffing!
I started off with a rack of pork. Looks great, doesn't it? I cut the rack into individual chops.
In a pan I cooked the sausage, taken out of the casing with some garlic. After the sausage was cooked thoroughly it was pulsed in the food processor about 5 times.
I let the sausage cool and then added a pound of fresh chopped baby spinach leaves, and a handful of shredded mozzarella cheese. If you would like more cheese, go ahead and add it. I have big hands! LOL!
I added the stuffing to each of the chops and then seasoned the pork chops with salt and pepper.
I made an egg wash by beating a whole egg in a dish. I dipped the pork chops into the egg and then lightly dragged them through the flour, giving them a light dusting on each side. These went into a large frying pan that had a few tablespoons of olive oil and butter in it.  On high heat I seared each side of the pork chop to give it a lovely color.
After searing on both sides they went onto a parchment lined cookie sheet to finish in the oven.
They were baked in a preheated 375 degree oven for 15- 20 minutes on each side, for a total of 30 - 40 minutes. Don't over cook.
They were finished with a demi glaze porcini and mushroom sauce, and served! You can find my recipe for the sauce here.  Enjoy!  We did!
Buon Appetito
xoxoxo
Lorraine

Wednesday, September 7, 2011

I Wish It Were Me!

Just a really quick post tonight! Today was my son Stephen's first day at The French Culinary Institute in New York City! I'm so excited for him!
These are his text books!
I am so looking forward to his homework!

Have a great night everyone!

Buon Appetito
xoxoxo
Lorraine

Tuesday, September 6, 2011

Calamari Ripieni

Sometimes I just surprise myself while cooking! Really! During the hurricane warnings I decided to marathon cook. While looking in my freezer I decided to cook up what would defrost quickly if we lost power.  I grabbed 5 pounds of calamari and a few packages of extra large jumbo shrimp. What to do, what to do....I had just finished jarring 60 quarts of tomatoes...so the ideas kept coming.
I started off by making a tomato sauce with onions, garlic, fresh herbs and some olive oil. While that was simmering I started thinking about the calamari and decided to cook half of it in the sauce and have that over pasta, and the other half I would use to stuff the calamari. YUM!
OMG! These came out so good. I made a stuffing using the tentacles from the calamari, celery, onion, garlic, capers, parsley pesto, breadcrumbs, and lemon juice. I sauteed all the ingredients in a little olive oil and it looked a little something like this!
I didn't add alot of breadcrumbs, just a small handful! I seasoned with salt and pepper and started to stuff the tubes of the squid.
When stuffing the tubes of the calamari, don't overstuff. Only stuff half way. If you over stuff, they will burst open while cooking. Keep stuffing until all the tubes are stuffed. If you would like close them with a tooth pick at the opening.
I started cooking an onion in some olive oil.  And when the pan was nice and hot I added all the calamari tubes to the pan. I got a nice sear on each side.

Now it's time to make the sauce!  I just added a little bit of the fresh tomato sauce and let the calamari simmer for a few minutes. It doesn't take very long for the calamari to cook. You just want them to be tender.  These were absolutely delicious!  My family felt like Christmas Eve after this dinner!
Let me know if you make these. And as always if you have any questions I am more than happy to answer them. Leave a comment. Make my day! MWAH!

Buon Appetito
xoxoxo
Lorraine

Sunday, September 4, 2011

Pasta with Vodka

I absolutely adore this recipe for Vodka Sauce, so do most of my friends so much so that they give it out like it's their very own! lol!  I am a firm believer in giving credit where credit is due! The credit belongs to Nika Hazelton.

There's a story attached...ready? lol

Before I got married I lived with my mother.  Steve lived an hour away so when he would come down to my mother's house  for dinner my mother always wanted to make him something special. (My mother loved my husband. He was one of her favorites. Heck, she would put the steak through the grinder in the morning to make him a hamburger! That's another story and another post!)
Anyway, while Steve and I were dinning out one evening,  we had this pasta with a Vodka Sauce. We fell in love with it. We wanted more of it.  I hunted for a cookbook with a recipe, and finally I found one,  Nika Hazelton's Pasta Cookbook. We laughed, because who the hell heard of Nika Hazelton, and what kind of an Italian was she? Little did we know that her recipes from this little cook book of pasta's are amazing.  Just goes to show you never judge a book by it's cover or a chef by their name!
Sure, pick up an Italian cookbook today and see if it doesn't have a recipe for Ziti ala Vodka! Most of them do but all I can say is, that it wasn't a common dish back in the day!
So one night I decided to make this for Steve and I.  I used so much Vodka ( I think I doubled it, I know I used almost half a bottle of Stoli, because I thought that would be a good idea, and I didn't let it cook off) that while we were eating the rigatoni we were getting giddy. We were actually getting bombed!  My mom just kept looking at us, wondering why we were acting so stupid! I think she even called the neighbor to come over to see how "stupid" we were acting while we were eating!  Now I know. Do not increase the amount of vodka in this recipe. It's not needed and it will make you a little stupido!
I'm going to warn you, that the pot is a real pain in the butt to clean, but it's worth the soak!

This recipe has been adapted by Nika Hazelton's Pasta Cookbook

Pasta With Vodka, Cream and Tomato Sauce

1 pound thick pasta, I like ziti or rigatoni
1 stick unsalted butter
3/4 cup good quality vodka
1/2 teaspoon dried hot pepper flakes
1/4 teaspoon Worcestershire sauce
1 cup thick tomato sauce
1 cup heavy cream*
salt
freshly ground pepper
1 1/2 cups freshly grated Parmesan cheese
additional Parmesan cheese and hot pepper to serve

Cook the pasta in boiling salted water until just al dente ( with a bite) Drain well.
While the pasta is cooking make the sauce.

Melt the butter in a pot that is large enough to hold all the pasta. Add vodka, pepper flakes and worcestershire sauce, mix well and simmer over low to medium heat for 5 minutes. Blend in tomato sauce and cream and bring to a boiling point. simmer for about 5 minutes or until the sauce has thickened slightly. Season with a little salt and pepper .

 Add the hot drained pasta to the sauce and toss well. Reduce the heat to very low and stir in the cheese. Serve immediately!
* Cream must be used, anything lighter will separate and not blend while cooking. Just don't do it! Take my word for it. To hell with the calories and enjoy!


Buon Appetito
xoxoxo
Lorraine

Friday, September 2, 2011

Hunka Munka Burning Love

What do you get when you cross a Banana Cream Pie with a Peanut Putter Cream Pie? You get a Hunka Munka Burning Love Pie!
Nothing is better than the combination of chocolate, peanut butter and bananas.  There may be better combo's out there, but at the moment I can't think of any. My brain is too focused on The Hunka Munka right now!
The inspiration for this cream pie is a result of taking someone else's recipes and playing with ingredients and making it my own.  The Peanut Butter Cream Pie from In Jennies Kitchen,  and Bobby's,  Hunka Munka Blondies gave me the idea to combine the ingredients and make a cream pie! My husbands favorite is Banana Cream Pie, and he loved the Peanut Butter Cream Pie so what could be better than making it all into one. Layers of delicious indulgence!
Here's what I came up with. This is a no bake pie. Relatively easy to do. Get ready to blow your friends away! They are going to love this!

Hunka Munka Burning Love Pie


Crust
4 Tablespoons Butter
8 ozs chocolate cookies
1/2 cup chocolate chips

1/4 cup Hershey's Chocolate Syrup
1 cup peanuts, chopped
3 sliced Bananas
8 ozs cream cheese at room temperature
1 cup creamy smooth peanut butter
1 14oz can sweetened condensed milk
1 tsp vanilla
1 cup milk
1 cup heavy whipping cream
1 package instant banana pudding


In a food processor pulse chocolate cookies until they become a crumb.
Melt the butter and chocolate chips together, (I used the microwave )
With a fork mix the cookie crumbs with the melted butter and chocolate.


Press the crumb mixture into the bottom, and up the sides a little bit of a 9 inch spring form pan.

Add the chocolate syrup, and smooth it out with a spatula.


Sprinkle with the chopped nuts

Slice two of the bananas and layer on top of peanuts. Reserve one of the bananas to  decorate the top of the pie.
With a mixer beat the cream cheese and the peanut butter together until light and fluffy. Add the sweetened condensed milk and the vanilla.  Add this layer on top of the sliced banana layer.
In a deep bowl beat the heavy cream and the milk together, add the package of instant banana pudding to the liquid and beat to a whipped cream texture. It will happen very fast.
Scoop the pudding/ cream  mixture on top of the peanut butter cream.
Decorate with chocolate chips, and more chopped peanuts. Chill for at least 6 hours or overnight!


And before serving, add more sliced banana! Serve and indulge!

Enjoy!
Buon Appetito
xoxoxo
Lorraine